I had heard of nginx as a very good web server from the perspective of performance. So I decided to try it out for one of my learning endeavors.
Installation
Installation of nginx on my Ubuntu was a breeze. Nginx is available as part of the Ubuntu distribution from Canonical. So I could just search the Ubuntu Software Center and install it on my machine. Once installed, starting and stopping the nginx server is simple. Just open the terminal, and use the following commands
sudo nginx(starts the server)sudo nginx -s quit(stops the server)sudo nginx -h(provides basic usage help)
One thing to notice is that you have to execute these commands with superuser privileges (sudo).
Setting up the virtual host
Being able to run the nginx server is all good. But for me to use it, I needed a virtual host where I can put my development site’s content.
Using the readily available and trusted resource, I reached a link which talked about this. After reading the same and some experimentation, I was able to set the virtual host. Below is a brief description of the steps which I followed:
Folder Structure
Once nginx is set up, you find the following folder where definitions of the virtual hosts are kept:
/etc/nginx/
The folder structure is as depicted below:
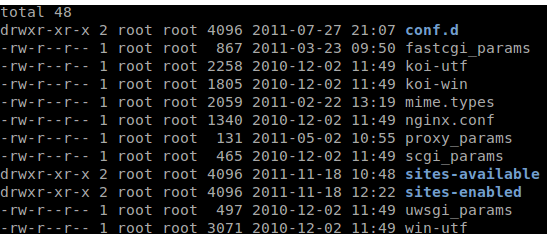
The important folders for our discussion are sites-available and sites-enabled. For all sites which are to be hosted by nginx inside the current machine, an entry needs to be made inside the sites-available folder. A file needs to be created which holds the configuration and the name of file is the domain name. For example, I can create a file - ex.nacnez.com which represents the domain name using which the virtual host can be accessed. The contents of the configuration file are as follows (remember this is just the basic stuff - more configuration is possible but for setting up the virtual host this is good enough):
server {
    listen   80;
    server_name example.nacnez.com;
    access_log  /home/your/docroot/basepath/ex.nacnez.com/log/access.log;
    error_log  /home/your/docroot/basepath/ex.nacnez.com/log/error.log;
    location / {
        root   /home/your/docroot/basepath/ex.nacnez.com/public/;
        index  index.html;
    }
}
Here /home/your/docroot/basepath means the base path under which you want to store your site and its document root folders.
Setting up the actual document root
The contents of your site is generally placed under its document root folder.
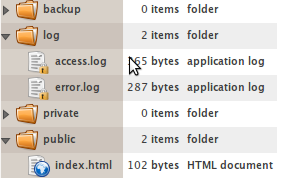
If you look at the configuration above you can understand where the document root of your site is placed. Under the public folder is where your index file (index.html as per the above configuration and which could contain any HTML content) and other website artifacts go. Anybody accessing your web server through the above domain (of course there is more work to be done for that) is taken to this folder. The log folder is used to store logs like access and error logs. There are a couple of other folders (private and backup) but they are not used for simple setups (and I don’t even know how they are going to be used - may be something for a future post).
Enabling the virtual host
Though the configuration file has been created inside the sites-available folder, the nginx server still does not serve the pages of this site yet. For enabling this, one needs to create a soft link to the config file inside the sites-enabled folder.
sudo ln -s /etc/nginx/sites-available/ex.nacnez.com /etc/nginx/sites-enabled/ex.nacnez.com
This enables the site on nginx. Once you restart nginx ideally this site should be available.
Setting up the hosts file
The last important step is to ensure that the hostname is configured in the DNS server to point to your machine. Since I was using it just for my local development, I went ahead and configured my /etc/hosts file.
127.0.0.1 ex.nacnez.com
Once this is done, we are all set. If you crank up the browser and type in the domain name you must get the content of your index page.
This was my first encounter with nginx. This was enough for me for my current use of nginx. Hopefully I will get pushed to learn more on nginx and that should be fun. I did get pushed — see Nginx Serves Us like this - Maybe for a deeper dive into how nginx actually works inside: its master/worker architecture, epoll, and event-driven request processing.